Have you ever struggled with spacing and aligning stamping on leather evenly? If so, you’re not alone. Many leather crafters face this challenge when trying to achieve a professional and polished look. Whether you’re working on a belt, wallet, or any other leather project, achieving perfect spacing and alignment can make a significant difference in the final outcome. In this article, we’ll explore some tips and techniques to help you master this skill and create beautifully crafted leather items. So, let’s get started and take your leather stamping game to the next level!

Determining the Placement of Stamping on Leather
Selecting the Design and Stamp
Before you begin the process of stamping leather, it’s important to first select the design you want to create. Think about the overall look and feel you want to achieve and choose a stamp that suits your vision. There are numerous stamp designs available, ranging from simple geometric shapes to intricate patterns and images. Take your time to browse through the options and find a stamp that resonates with you.
Choosing the Placement
Once you have chosen your stamp design, you need to consider where you want to place it on the leather. Some common areas for stamping include belts, wallets, and bags. Think about the size and shape of the stamp, as well as the overall dimensions of the leather item you are working with. The placement of the stamp can greatly impact the final look of the piece, so take your time to visualize different options and choose the one that best complements the design and the item itself.
Marking the Leather
To ensure accurate and even placement of the stamp, it’s helpful to mark the leather before you begin. This can be done using a pencil or a water-based marker. Carefully position the stamp on the leather and lightly trace around it. This will serve as a guide when aligning and spacing the stamps later on.
Using Templates or Guides
If you’re looking for precise alignment and spacing, using templates or guides can be incredibly helpful. These can be commercially available tools specifically designed for leather stamping, or you can create your own by cutting out shapes from cardboard or plastic. These templates or guides can assist you in positioning the stamps consistently and evenly across the leather surface. They serve as a valuable tool in achieving professional-looking results.
Preparing the Leather for Stamping
Cleaning and Conditioning
Before you begin stamping, it’s important to clean and condition the leather properly. Use a leather-specific cleaner to remove any dirt or debris from the surface. After cleaning, apply a leather conditioner to ensure the leather remains soft and pliable. This will not only improve the stamping process but also help protect the leather and enhance its longevity.
Moistening the Leather
Depending on the type of leather you are working with, moistening it slightly can help achieve better stamp impressions. Use a spray bottle filled with water or a damp sponge to lightly moisten the leather surface. Be careful not to oversaturate the leather, as this may cause it to warp or stretch. Moistening the leather makes it more receptive to the stamping process and helps achieve deeper impressions.
Creating a Stable Work Surface
Having a stable work surface is essential for accurate and consistent stamping. Make sure you are working on a solid and level table or workbench. Placing a rubber or silicone mat under the leather can provide extra stability and prevent it from sliding or shifting during stamping. This will allow you to focus on the stamping process without worrying about the leather moving.
Securing the Leather
To prevent the leather from moving or wrinkling during stamping, it’s important to secure it in place. There are several ways to do this, depending on the size and shape of the leather piece. You can use clamps to hold it firmly in place, or you can use heavy objects, such as weights or books, to keep it steady. This will ensure that the leather remains taut and allows for precise stamping.
Ensuring Even Spacing of Stamps
Using a Ruler or Measuring Tool
To achieve even spacing between your stamp impressions, a ruler or measuring tool can be incredibly helpful. Lay the ruler or measuring tool along the edge of the leather and use it as a guide to position each stamp at equal intervals. This will help maintain consistency and create a visually pleasing arrangement of stamps.
Creating Alignment Guides
To further ensure even spacing and alignment, create alignment guides on the leather. These can be small markings made with a pencil or water-based marker at regular intervals along the edge of the leather. These guides serve as reference points to position the stamps accurately and maintain consistent spacing throughout the stamping process.
Marking Reference Points
For more complex stamping patterns or designs, marking reference points can be beneficial. These reference points can be small dots or lines made with a pencil or marker on the leather. They serve as guide marks to align the stamps and keep the pattern consistent. By referencing these marks, you can ensure that each stamp is positioned correctly and achieves the desired spacing.
Working with Grids or Templates
If you prefer a more systematic approach, working with grids or templates can help you achieve precise stamp placement and spacing. Create a grid or template using cardboard or plastic, with evenly spaced holes or cutouts that correspond to the stamp size and spacing you desire. Lay the grid or template on top of the leather and use it as a reference to position each stamp accurately. This method ensures consistency and allows for complex patterns or designs.
Aligning Stamps Properly
Using a Stamping Tool
A stamping tool, such as a swivel knife or an awl, can assist in aligning the stamps properly. Before stamping, use the tool to lightly mark the outline of the design or pattern. This will serve as a guide for aligning the stamp accurately and achieving the desired placement. The stamping tool acts as a visual aid and helps ensure that each stamp is positioned correctly.
Positioning the Stamp on the Leather
When aligning the stamp on the leather, pay attention to the overall design and any reference points or outlines you have marked. Position the stamp at the desired location and make sure it is aligned with the marks or guides you have created. Take your time to adjust the stamp’s position until you are satisfied with the alignment.
Applying Even and Gentle Pressure
To achieve consistent results, it’s important to apply even and gentle pressure when stamping. Place the stamp firmly on the leather surface, making sure it is level. Use your palm or a mallet to apply pressure, ensuring that the stamp makes full contact with the leather. Applying excessive force may cause the impression to be too deep, while insufficient force may result in a faint or uneven impression.
Checking Alignment and Adjusting
After making the first impression, check the alignment and overall appearance of the stamped design. If necessary, make slight adjustments to the stamp’s position to ensure proper alignment and spacing. This step is crucial to maintaining consistency throughout the stamping process. Continually assess each impression and make any necessary corrections to achieve the desired results.
Achieving Consistency in Stamp Depth
Choosing the Right Amount of Force
The depth of a stamp impression greatly contributes to the overall look and feel of the design. To achieve consistent stamp depth, it’s important to find the right amount of force to apply. Experiment on scrap leather to determine the pressure required for your desired impression depth. Remember that different leathers may require different amounts of force, so adapt accordingly.
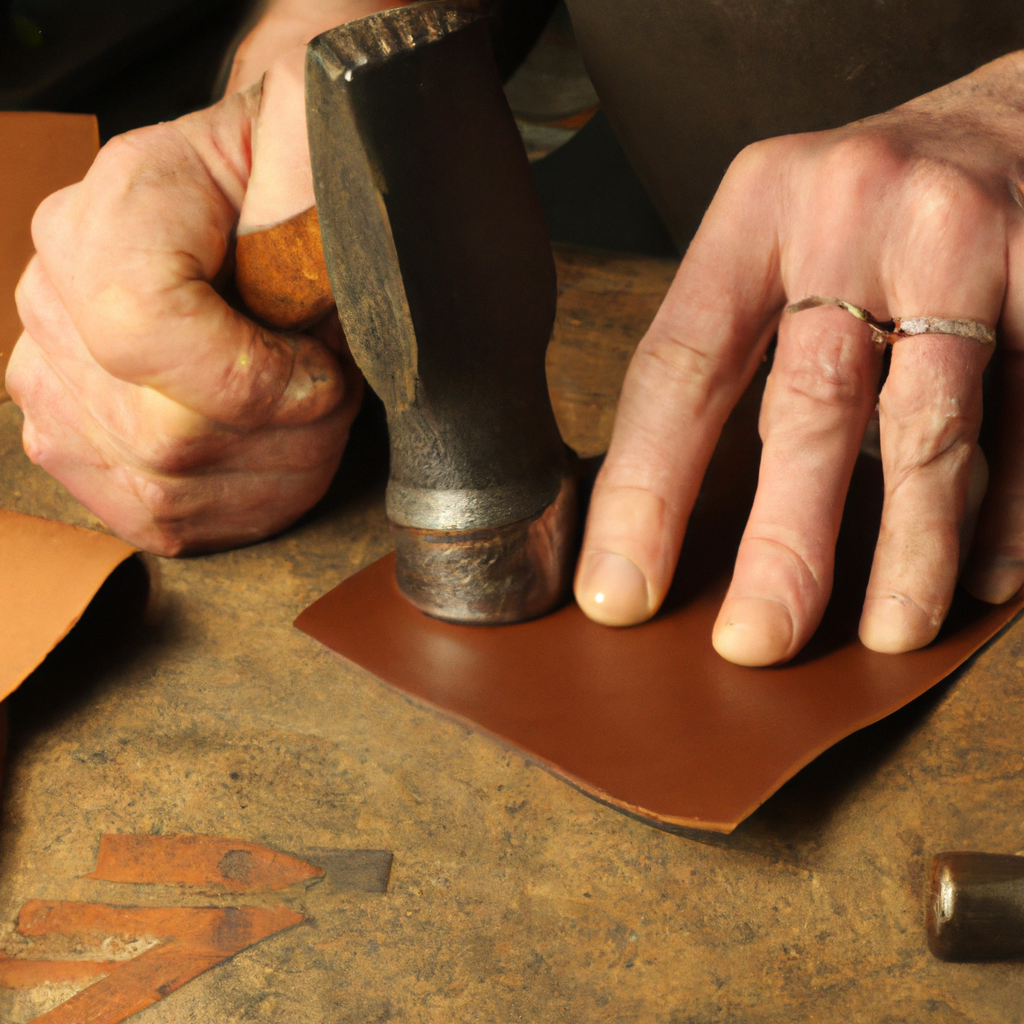
Using a Mallet or Hammer
When stamping leather, you can use a mallet or hammer to apply pressure to the stamp. This helps ensure consistent force and depth across each impression. Choose a mallet or hammer that is appropriate for your stamp size and the thickness of the leather. Use controlled and even strikes to achieve consistent and uniform impressions throughout the stamped design.
Testing on Scrap Leather
Before stamping your final project, it’s always a good idea to test your stamp and technique on a piece of scrap leather. This allows you to adjust the force and achieve the desired depth without risking any mistakes on your actual piece. Take the time to practice and refine your technique on scrap leather until you are confident in your ability to achieve consistent stamp depth.
Adjusting Pressure as Needed
While stamping, regularly evaluate your impressions to ensure consistent depth. If you notice variation in the depth, adjust the pressure applied with the mallet or hammer accordingly. This may involve slightly increasing or decreasing the force used. Continuously adapting the pressure throughout the stamping process will help maintain uniformity in the depth of the impressions.
Taking Care with Borders and Patterns
Creating Straight Borders
When working with borders, it’s important to pay close attention to achieving straight lines. To create straight borders, use a ruler or a straight edge as a guide. Lightly mark the border with a pencil or water-based marker and then carefully stamp along the marked line. Take your time to ensure the stamps are aligned and evenly spaced, creating an attractive and visually pleasing border.
Using Border Tools for Consistent Patterns
To achieve consistent patterns along borders or within certain areas, using border tools can be highly beneficial. Border tools are specifically designed stamps that create repetitive patterns and designs. These tools typically come in different shapes and sizes, allowing you to choose the pattern that best suits your project. By using border tools, you can easily create uniform and visually appealing patterns on your leather.
Working in Sections
For larger leather projects or complex designs, it’s often helpful to work in sections. This allows you to focus on a specific area at a time, ensuring precise alignment and spacing. Begin by determining the starting point and laying out the stamp placement for the first section. Progress systematically, working your way through each section while maintaining consistency in spacing and alignment.
Verifying Alignment Along Borders
During and after stamping a border or pattern, it’s essential to regularly check the alignment and spacing. As you stamp along the border, periodically step back and assess the overall appearance of the design. Ensure that the stamps are staying aligned and that the spacing remains consistent. Regularly evaluating and adjusting will result in a professionally finished product.
Stamping Curved or Uneven Surfaces
Gradually Bending the Leather
Working with curved or uneven surfaces requires some additional techniques to achieve proper stamping. One method is to gradually bend the leather to match the curve or contour where you want to stamp. This helps ensure that the stamp makes full contact with the surface and results in a clean and even impression. Take your time and gently manipulate the leather to match the desired shape before stamping.
Using an Arming Press or Arbor Press
If you frequently work with curved or uneven surfaces, investing in an arming press or arbor press can greatly assist in achieving consistent stamping results. These mechanical devices provide controlled and even pressure, making it easier to achieve clean and accurate impressions on challenging surfaces. The press can stabilize the leather and ensure that the stamps are applied with the desired force and alignment.
Utilizing Swivel Tools
Swivel tools are especially useful when stamping on curved or uneven surfaces. These tools have a flexible head that allows the stamp to adjust to the contour of the leather. By using a swivel tool, you can maintain consistent alignment and spacing regardless of the surface’s shape. This ensures that each impression conforms to the curve or contour, providing an appealing and professional finish.
Adapting Pressure for Different Areas
When stamping on curved or uneven surfaces, it’s important to adapt the pressure applied based on the specific area being stamped. Parts of the surface that are more concave will require less force to achieve the desired impression depth. Conversely, areas that are more convex may require slightly more force. Continuously assess the stamping process and adjust the pressure accordingly to maintain consistency in depth across the entire surface.
Adding Depth and Dimension with Stamps
Experimenting with Different Stamps
To add depth and dimension to your stamped leather, experiment with different stamp designs. Mix and match stamps with varying textures, sizes, and patterns. By using a combination of stamps, you can create interesting and dynamic effects that enhance the overall design. Play around with different stamping techniques and combinations to discover unique ways to bring your leather projects to life.
Creating Shadows with Multiple Impressions
One effective technique for adding depth is to create shadows using multiple impressions of the same stamp. By slightly offsetting each subsequent impression, you can achieve a shadow effect that adds dimension and visual interest to the design. Experiment with different spacing and offsets to create the desired shadow effect. This technique is particularly effective for textured stamps or stamps with intricate details.
Enriching the Design with Tinting or Painting
To further enhance the stamped design and add depth, you can consider tinting or painting the leather. After stamping and allowing the impressions to dry, apply a leather dye or acrylic paint to selected areas. Use a soft brush or sponge to apply the color, focusing on the recessed areas and details created by the stamp impressions. This technique brings out the design’s intricacies and adds richness and depth to the overall appearance.
Finishing and Protecting the Stamped Leather
Once you are satisfied with the stamped design, it’s important to finish and protect the leather. Apply a leather finish or conditioner to seal the surface and protect it from moisture and wear. This step not only enhances the appearance of the stamped leather but also ensures its longevity. Follow the manufacturer’s instructions for the specific finish or conditioner you are using to achieve the best results.
Practicing and Refining Your Technique
Start with Basic Designs and Patterns
If you’re new to stamping leather or want to refine your technique, it’s best to start with basic designs and patterns. Begin with simple geometric shapes or straightforward patterns. This allows you to focus on mastering the fundamentals of stamp placement, alignment, and depth. As you become more confident and comfortable, gradually progress to more complex designs and patterns.
Working on Scrap Leather
To improve your stamping skills and refine your technique, practice on scrap leather before working on your final project. This allows you to experiment with stamp placement, alignment, and pressure without the pressure of achieving a perfect result. Take the time to analyze your practice pieces, make adjustments, and learn from any mistakes. Continual practice on scrap leather will help you develop your skills and achieve consistent and professional results.
Continuously Evaluating and Adjusting
Even if you have been stamping leather for some time, it’s important to continuously evaluate and adjust your technique. Regularly assess the alignment, spacing, and depth of your stamp impressions. Make any necessary adjustments to achieve the desired results. Stamping leather is a skill that can always be refined and improved, so never stop assessing and fine-tuning your technique.
Taking Note of Successful Approaches
Throughout your stamping journey, take note of the techniques and approaches that yield successful results. Keep a journal or a record of your projects, documenting the stamp designs, placement, and any adjustments made. This can serve as a valuable reference for future projects and help you recreate successful results. By learning from your past experiences, you can continually improve and achieve consistent and professional stamping on leather.
– How Can I Use Basic Stamping Tools to Achieve Even Spacing and Alignment on Leather?
When using entry-level leather stamping tools, achieving even spacing and alignment is crucial for a professional finish. To ensure consistent results, use a ruler or spacing tool to mark where each stamp will go. Practice with light taps to familiarize yourself with the pressure needed for a clean impression.
Seeking Inspiration and Learning Resources
Exploring Leatherworking Communities
To find inspiration and connect with other leatherworkers, explore online leatherworking communities. Join forums or social media groups dedicated to leatherwork. Engage with fellow enthusiasts, share your work, and learn from their experiences. Leatherworking communities provide a wealth of knowledge, inspiration, and support to help you improve your stamping technique and explore new ideas.
Attending Workshops or Classes
Consider attending workshops or classes led by experienced leatherworkers. These hands-on learning experiences can provide invaluable guidance and feedback. Workshops often cover various techniques, including stamping, and offer an opportunity to ask questions and learn from professionals. Take advantage of these learning opportunities to gain new insights, refine your skills, and connect with others in the leatherworking community.
Researching Online Tutorials and Videos
The internet is a vast resource for learning about leather stamping. Search for online tutorials and videos that provide step-by-step instructions and demonstrations of stamping techniques. Many experienced leatherworkers and artisans share their knowledge and expertise through instructional videos. Take advantage of these resources to expand your knowledge, learn new techniques, and gain inspiration for your own projects.
Studying Books and Magazines
Books and magazines dedicated to leatherworking can provide a wealth of information and inspiration. Look for publications that specifically cover stamping techniques and explore the different approaches and styles showcased in these resources. Study the work of experienced leatherworkers and learn from their tips and tricks. Building a library of leatherworking books and magazines can be a valuable resource for continuous learning and growth in your stamping journey.
By following these guidelines and practicing your stamping technique, you can achieve even spacing, proper alignment, and consistent stamp depth on leather projects. Remember to take your time, experiment with different designs and techniques, and continuously refine your approach. With dedication and practice, you’ll become proficient in stamping on leather and create beautiful, professional-looking designs.