
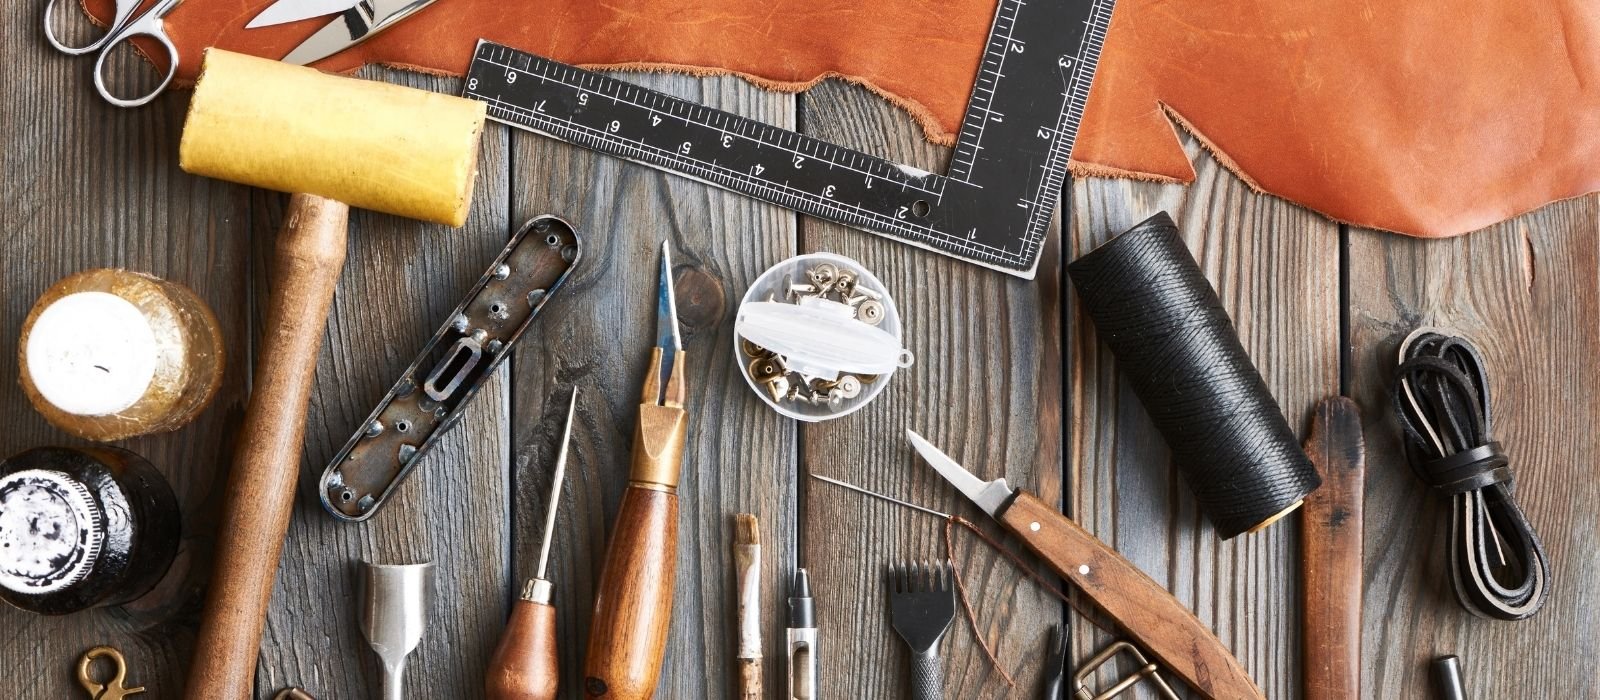
What Every Leather Crafter Needs
What Every Leather Crafter Needs is the right tools for the job, It might be difficult to decide which leatherworking tools you will need if you are just beginning. Most new leatherworkers start by buying a kit online. That may be a significant investment. In this post, you’ll learn about the twelve most important leatherworking tools, so you can be sure you’re not missing out on any of them.
Cutting Tool for Leather
If you plan on working with leather, you’ll need a set of leather cutting equipment. Using these tools makes the process more accessible, and shave and cut leather.
You may choose from a variety of various cutting implements. The Round Knife is a specific piece of equipment. In most cases, they are utilized for regular leather cutting and shaping. In addition to having a round blade that lends the tool its name, round blades exist in various sizes, are great for a wide range of tasks, and are perhaps the most recognizable tool in a leather workshop.
There are a number of different types of shears that are popular with novices. Using shears to carve out patterns in your leather is excellent assistance. They may also conserve material by snipping off tiny leather portions from a more significant piece.
Rotary cutters are especially popular with novices since they are inexpensive and straightforward, even if they aren’t ideal for long-term tasks. Using these blades, you will easily and accurately cut leather.
For cutting out relatively tiny parts, scissors are possible, but they may leave sharp edges on leather and are difficult to cut through vast amounts of leather.
Cutting Mats
To keep your cutting surfaces safe, you must be careful. This may be accomplished using a high-quality cutting mat, which provides a stable surface to cut. With various distinct marks, cutting mats may help you get the job done more efficiently. They are ideal if your sole working space is a kitchen table or other surface that you don’t want to harm.
A huge board that covers the work table or is large enough to accommodate the full leather job is recommended. A leather piece dangling over the edge of your cutting board is a recipe for disaster.
Diamond Stitching
Please accept my apologies; these are not diamond chisels. Diamond is used to referring to the form of the blade, not to its material. A leatherworker’s toolbox would not be complete without these.
Leatherworkers often use diamond stitching chisels to cut stitching holes in leather, which is a regular activity and must be done carefully to prevent injuring the leather.
Diamond stitching chisels are an excellent option for novices because of their simplicity, but many people are turned off by the amount of force needed to cut through the leather with them. After a few practice cuts, you’ll discover that using a diamond chisel is relatively painless.
You may spend a lot of time making holes in leather with the diamond chisel since it can punch through many layers of leather without difficulty.
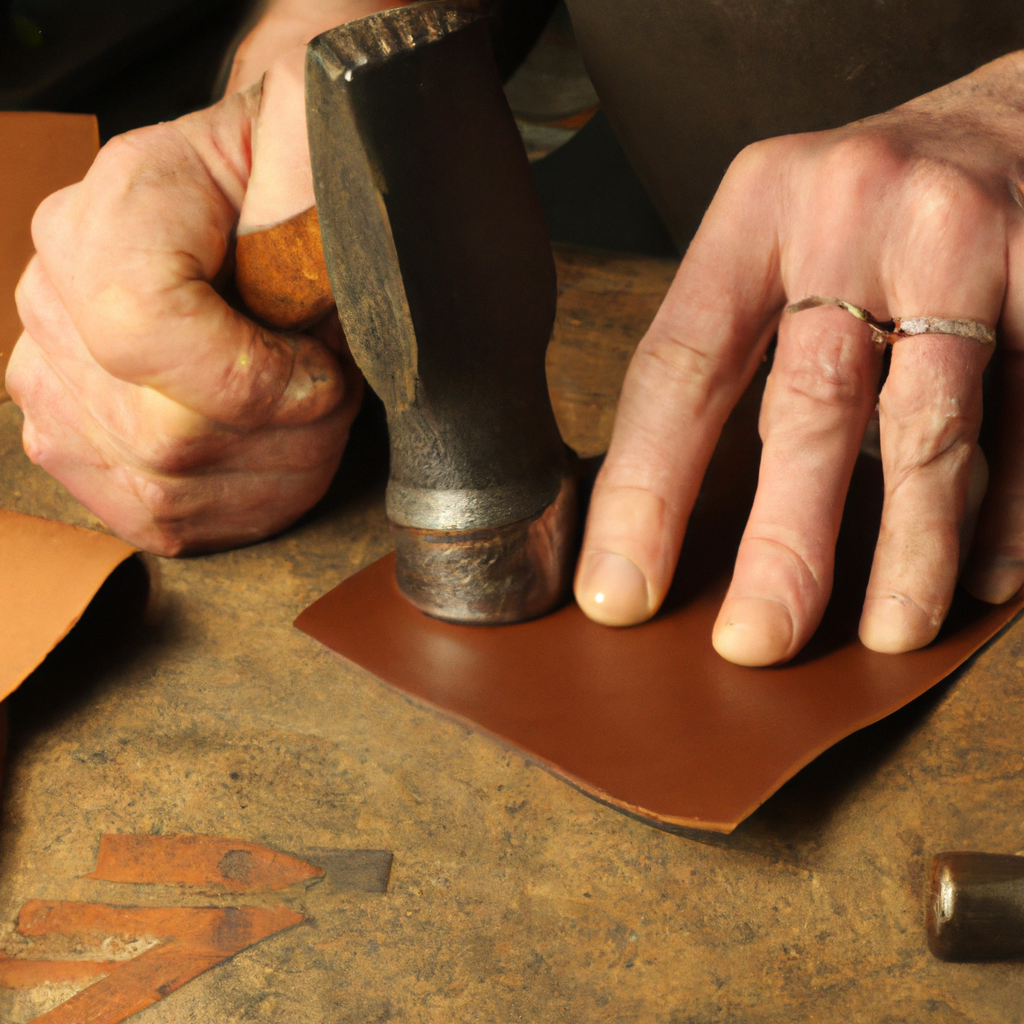
Mallet
First of all, I’d want to provide a caution. Using a metal hammer while working with leather may harm your tools, so please refrain from doing so.
Mallets are often included in leatherworking kits. When you’re stamping, marking, or cutting leather, you’ll need one of these. They come in a variety of sizes and forms.
To get the most out of your Maul, you’ll probably want to update your mallet. Even though they are the same, the Maul is more flexible, more pleasant to wield, and most likely manufactured from superior materials. The leather will not “flake” when you work it because of this.
Having a variety of mallets and mauls is acceptable. You’ll still need the smaller mallets for delicate work while you’re working on larger projects.
Awl For Stitching
It’s one of the first essential tools you should have and one of the most helpful, so don’t forget to get one.
Leather may be stitched with a stitching awl, which has a needle. Other stitches may also be made on the flat surface. It may also be used to sew on patches and edges, to finish seams, or as a starting point for constructing patterned embroidery patterns.
The sewing awl’s greatest strength is its adaptability. It may be used in various ways to accomplish some quite intricate leatherwork.
It’s common for newbies to assume they require a high-quality thread needle, but they’ll quickly convert to an awl. I did.
Needles for Leather Stitching
Needles used for leather sewing have a blunt tip at one end and a rounded point at the other. These are the tools you need for putting leather parts together by hand. Because leather is so thick and durable, you’ll need a tool that slices rather than punches through it. Leather creations may now be repaired with ease, thanks to this method.
These needles are ideal when sewing with soft fabrics like suede and corduroy or creating the “stitched” leather effect.
To create a decorative edge, leather sewing needles are ideal. It is possible to utilize needles as a finishing element in repair and restoration operations.
Skiver
Using a Skiver, you may decrease the thickness of leather by dragging a broad, sharp blade over the surface.
To match the thickness of the buckle or strap, a skiver is most often used to thin the leather of belts. It may also be used to cut leather in hard-to-reach locations. In the example of securing a buckle with a fold of leather, a skiver reduces the thickness of the material so that it doesn’t seem overly thick and unwieldy.
A bracelet’s “french folds” are created using the same thinning procedure.
The Edge Beveller
When it comes to smoothing the edges of your leather, Edge Beverllers (sometimes referred to as leather edgers or leather bevellers) are an essential instrument.
Edge Bevellers come in various shapes and sizes, but the most basic is a flat piece of metal. However, numerous blades are available, depending on what the beveled is supposed to perform and the look you want to produce.
No. 1 bevellers remove the least amount of leather, whereas No. 2 bevellers are more aggressive.
Using a specific “reinforcing chemical,” you may bevel a tiny portion of the leather’s sides, making it more resistant to ripping and damage. On the other hand, the edge beveled is a must-have for most leatherwork.
Groove
According to the Groover moniker, it’s used to make grooves. It is possible to add minute details to your completed artworks and minimize the weight and bulk of your final product using Groover’s cutting wheel, which generates a ‘V’ shape in your leather. When developing fold lines in your leather, you can also use this tool (perfect for folds and pockets in your final products).
Larger forms may be carved out using a Groover as well. Create a groove in your leather if you’d want to carve out a distinctive design before moving on to other parts of the piece. Grooving leather into these shapes and grooves is easy with the Groover.
Slabs of Marble
The majority of work surfaces feature a degree of flexibility. If you’re stamping or cutting leather, this might lead to issues like snaps or rivets, which is why it’s important to know what you’re doing.
As a result, a denser worktop will be required to meet your needs. Marble slabs are ideal for this scenario since they offer firm surfaces for cutting, sewing, and marking that won’t shift beneath the leather.
Marble worktops are ideal for skiving because the wet leather is more likely to adhere to the marble than a conventional work surface.
Burnisher For The Edges
When it comes to edge finishing, burnishing is a crucial step. If you want your leatherwork to seem polished, you need to finish the edges. This involves rubbing the leather edge back and forth to give it glossy.
I like to use deer antlers to polish the edges of my leather, but there are many other options available.
However, in the absence of deer, other instruments may be used to accomplish the same goal. Using a 6″ long wooden burnisher, the edge of the leather receives a decent amount of pressure and precisely the right amount of rotation under tension while being burnished.
A total of twelve hole punches were used.
A leather punch consists of a blade and a handle. Use this tool to make belt loops or any other hole form in your leatherwork by making holes along the leather’s edges.
This instrument is quite dangerous if misused, so be sure to use care while using it. When using a punch, be careful not to apply too much pressure since this might cause the metal to melt into the leather and create a mark on your item.
It’s highly convenient to utilize leather hole punches since they’re simple to use, and they can make accurate and consistent holes in your leather. With a variety of blades, these tools may be used to cut holes in various shapes and sizes, making utilizing them more efficient and accurate.
Conclusion
Essential equipment like these will allow you to enjoy leathercraft without fear of being irritated or not being able to finish the project you’re working on, no matter how big or tiny your project is. Make sure you have these in your kit.


Leave a Reply
You must be logged in to post a comment.